Dell Container Storage Module; a GitOps-ready platform!
Introduction
One of the very first things I do after deploying a Kubernetes cluster is to install a CSI Driver to provide persistent storage to my workloads ; coupled with a GitOps workflow; it takes seconds literally to be able to run stateful workloads.
GitOps process is nothing more than a few principles :
- Git as a single source of truth
- Resource explicitly declarative
- Pull based
Nonetheless, to be smooth, it requires the application you will manage with GitOps to be compliant with these principles.
The following article will show us how to use the Azure Arc GitOps solution to deploy the Dell CSI driver for PowerMax and affiliated Container Storage Modules.
Azure Arc GitOps
The platform we will use to implement the GitOps workflow is Azure Arc with GitHub. Still, other solutions are possible using Kubernetes agents like Argo CD, Flux CD GitLab or else.
Azure GitOps itself is built on top of fluxcd.
Install Azure Arc behind a proxy
The first step is to onboard your existing Kubernetes cluster within Azure portal.
Obviously, the Azure agent will connect to the Internet. In my case, the installation of the Arc agent fails from the Dell network with the same error as : https://docs.microsoft.com/en-us/answers/questions/734383/connect-openshift-cluster-to-azure-arc-secret-34ku.html
Certain URLs (albeit proxy bypassed in the Corporate Proxy) don’t play well when communicating with Azure. I witnessed that some services got a self-signed certificate causing the issue.
The solution for me was to put an intermediate transparent proxy between the Kubernetes cluster and the corporate cluster. That way, we can have better control over the responses given by the proxy.
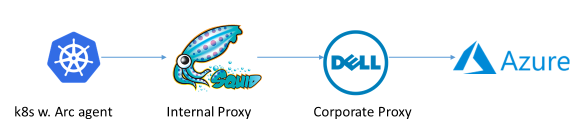
To make it work, I used the Squid image by Ubuntu and made sure that Kubernetes requests were direct with the help of always_direct:
To obtain the vanilla configuration, you can run:
docker run -d --name squid-container ubuntu/squid:5.2-22.04_beta ; docker cp squid-container:/etc/squid/squid.conf ./ ; egrep -v '^#' squid.conf > my_squid.conf
docker rm -f squid-container
Then add the following section :
acl k8s        port 6443        # k8s https
always_direct allow k8s
We launch the proxy with:
docker run -d -v ${PWD}/my_squid.conf:/etc/squid/squid.conf --name squid-container -e TZ=UTC -p 3128:3128 ubuntu/squid:5.2-22.04_beta
We can now install the agent per the following instructions : https://docs.microsoft.com/en-us/azure/azure-arc/kubernetes/quickstart-connect-cluster?tabs=azure-cli#connect-using-an-outbound-proxy-server
export HTTP_PROXY=http://mysquid-proxy.dell.com:3128
export HTTPS_PROXY=http://mysquid-proxy.dell.com:3128
export NO_PROXY=https://kubernetes.local:6443

az connectedk8s connect --name AzureArcCorkDevCluster --resource-group AzureArcTestFlorian --proxy-https http://mysquid-proxy.dell.com:3128 --proxy-http http://mysquid-proxy.dell.com:3128 --proxy-skip-range 10.0.0.0/8,kubernetes.default.svc,.svc.cluster.local,.svc --proxy-cert /etc/ssl/certs/ca-bundle.crt
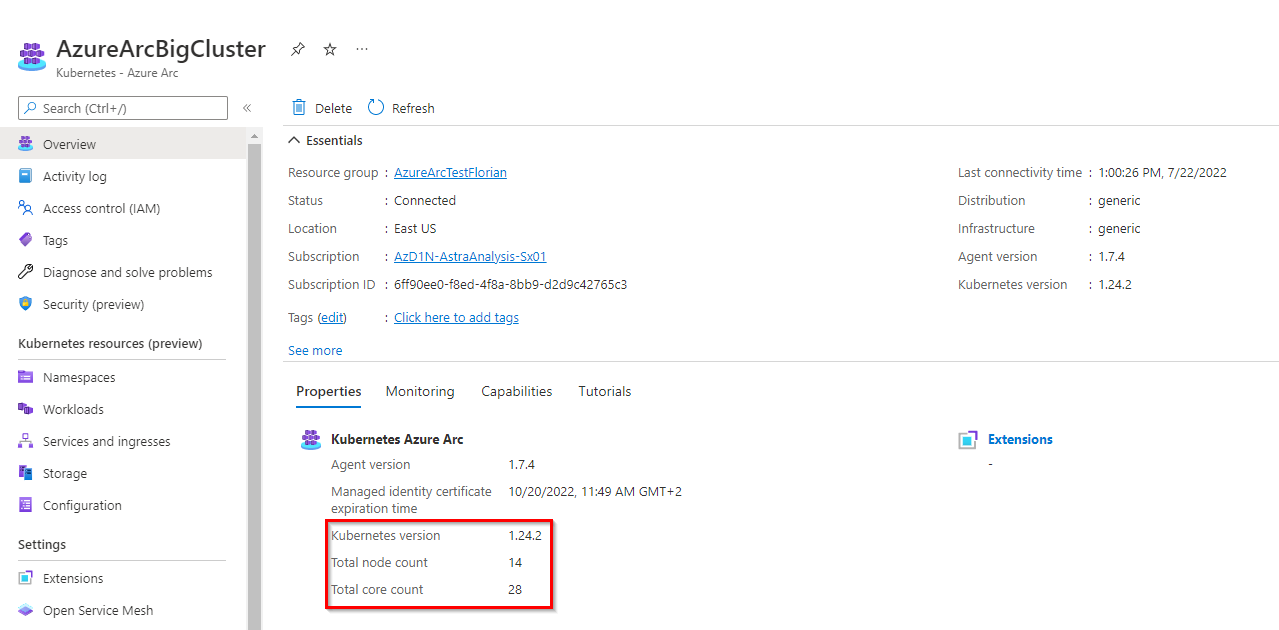
If everything worked well, you should see the cluster with detailed info from the Azure portal :
Add ServiceAccount to more visibility in Azure Portal
To benefit from all the features Azure Arc offers, we need to give the agent the privileges to access the cluster.
The first step is to create a service account :
kubectl create serviceaccount azure-user
kubectl create clusterrolebinding demo-user-binding --clusterrole cluster-admin --serviceaccount default:azure-user
kubectl apply -f - <<EOF
apiVersion: v1
kind: Secret
metadata:
  name: azure-user-secret
  annotations:
    kubernetes.io/service-account.name: azure-user
type: kubernetes.io/service-account-token
EOF
Then, from the Azure UI, when you are prompt to give a token, you can obtain it with :
kubectl get secret azure-user-secret -o jsonpath='{$.data.token}' | base64 -d | sed $'s/$/\\\n/g'
And paste it in the Azure UI.
Install the GitOps Agent
The installation can be done with a CLI or the Azure Portal.
As of now, the official doc presents in detail the deployment with the CLI ; so let’s see how it will work with the Azure Portal :
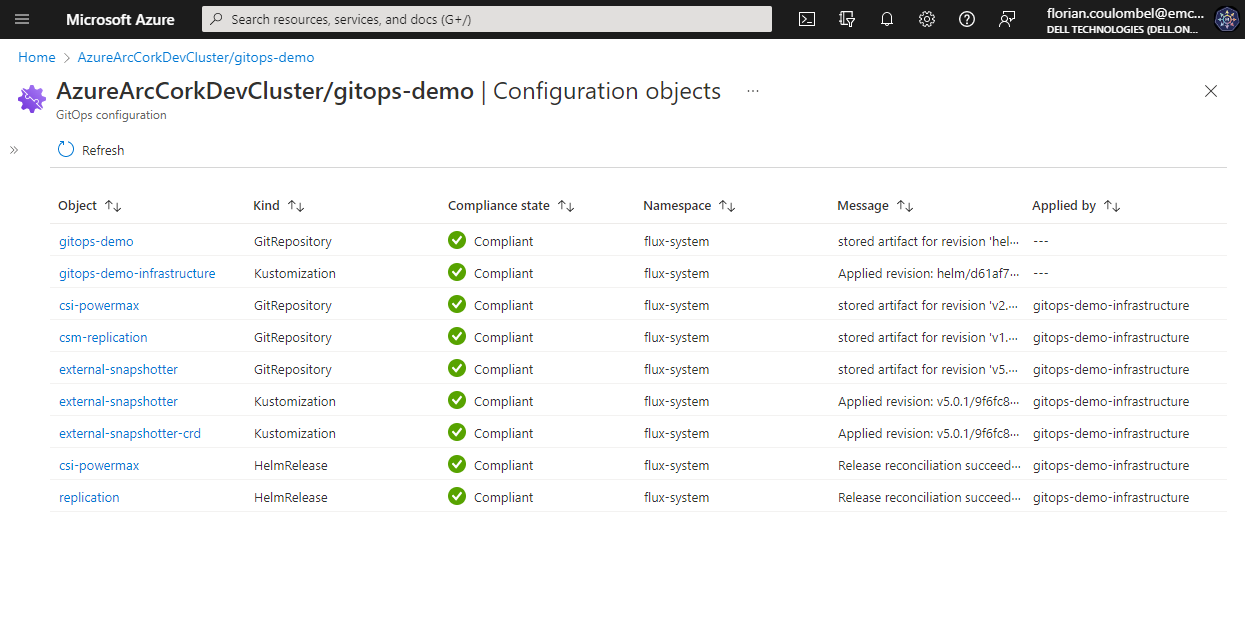
After a couple of minutes, if everything goes well, the result will look like:
Repository
The Git repository organization is a crucial part of the GitOps architecture. It hugely depends on how internal teams are organized, the level of information you want to expose and share, the location of the different clusters, etc.
In our case, the requirement is to connect multiple Kubernetes clusters owned by different teams to a couple of PowerMax using only the latest and greatest CSI driver and affiliated CSM for PowerMax.
Therefore the monorepo approach is suited.
The organization follows the below structure:
.
├── apps
│   ├── base
│   └── overlays
│       ├── cork-development
│       │   ├── dev-ns
│       │   └── prod-ns
│       └── cork-production
│           └── prod-ns
├── clusters
│   ├── cork-development
│   └── cork-production
└── infrastructure
    ├── cert-manager
    ├── csm-replication
    ├── external-snapshotter
    └── powermax
apps; contains the applications to be deployed on the clusters- we have different overlays per cluster
cluster; contains the cluster-specific fluxcd main configuration usually ; using Azure Arc, there is none neededinfrastructure; contains the deployments that are used to run the infrastructure services ; they are common to every clustercert-manager; is a dependency ofpowermaxreverse-proxycsm-replication; is a dependency ofpowermaxto support SRDF replicationexternal-snapshotter; is a dependency ofpowermaxto snapshotpowermax; contains the driver installation
You can consult all files in https://github.com/coulof/fluxcd-csm-powermax
The GitOps agent comes with multi-tenancy support therefore we cannot cross-reference objects between namespaces. It is important that the
KustomizationandHelmReleaseare created in the same namespace as the agent (hereflux-system) and have a correspondingtargetNamespaceto the resource to be installed
Demo !
Conclusion
This article is the first of a series that will explore more of the GitOps workflow. Next, we will see how to manage application and persistent storage with GitOps workflow, how to upgrade the modules, etc.